Sidebar navigation and options
Sidebar options include the sidebar navigation menu, sidebar call-to-action buttons, and sidebar widgets.
-
Sidebar navigation menu
The sidebar navigation menu allows users to easily navigate through the different sections and pages of your website and shows the user where they are in the sitemap. On any inside page (all pages other than the site home page), the sidebar navigation is automatically created based on the fellow pages in the same folder. Adding or removing pages in a folder will automatically update the sidebar navigation menu (changes must be published to the live site).
On large screen sizes, the sidebar navigation menu appears on the left side of the main content area. On small- and medium-screen sizes, the sidebar navigation menu moves below the main content area.
Depending on the type or width of the content on the page, you can choose to exclude the sidebar navigation menu on specific pages (the sidebar navigation menu is included on all pages by default).
How toExclude the sidebar navigation menu on a page
- In the Inline Metadata section of the page editor, set the Show sidebar navigation on this page? option to No.
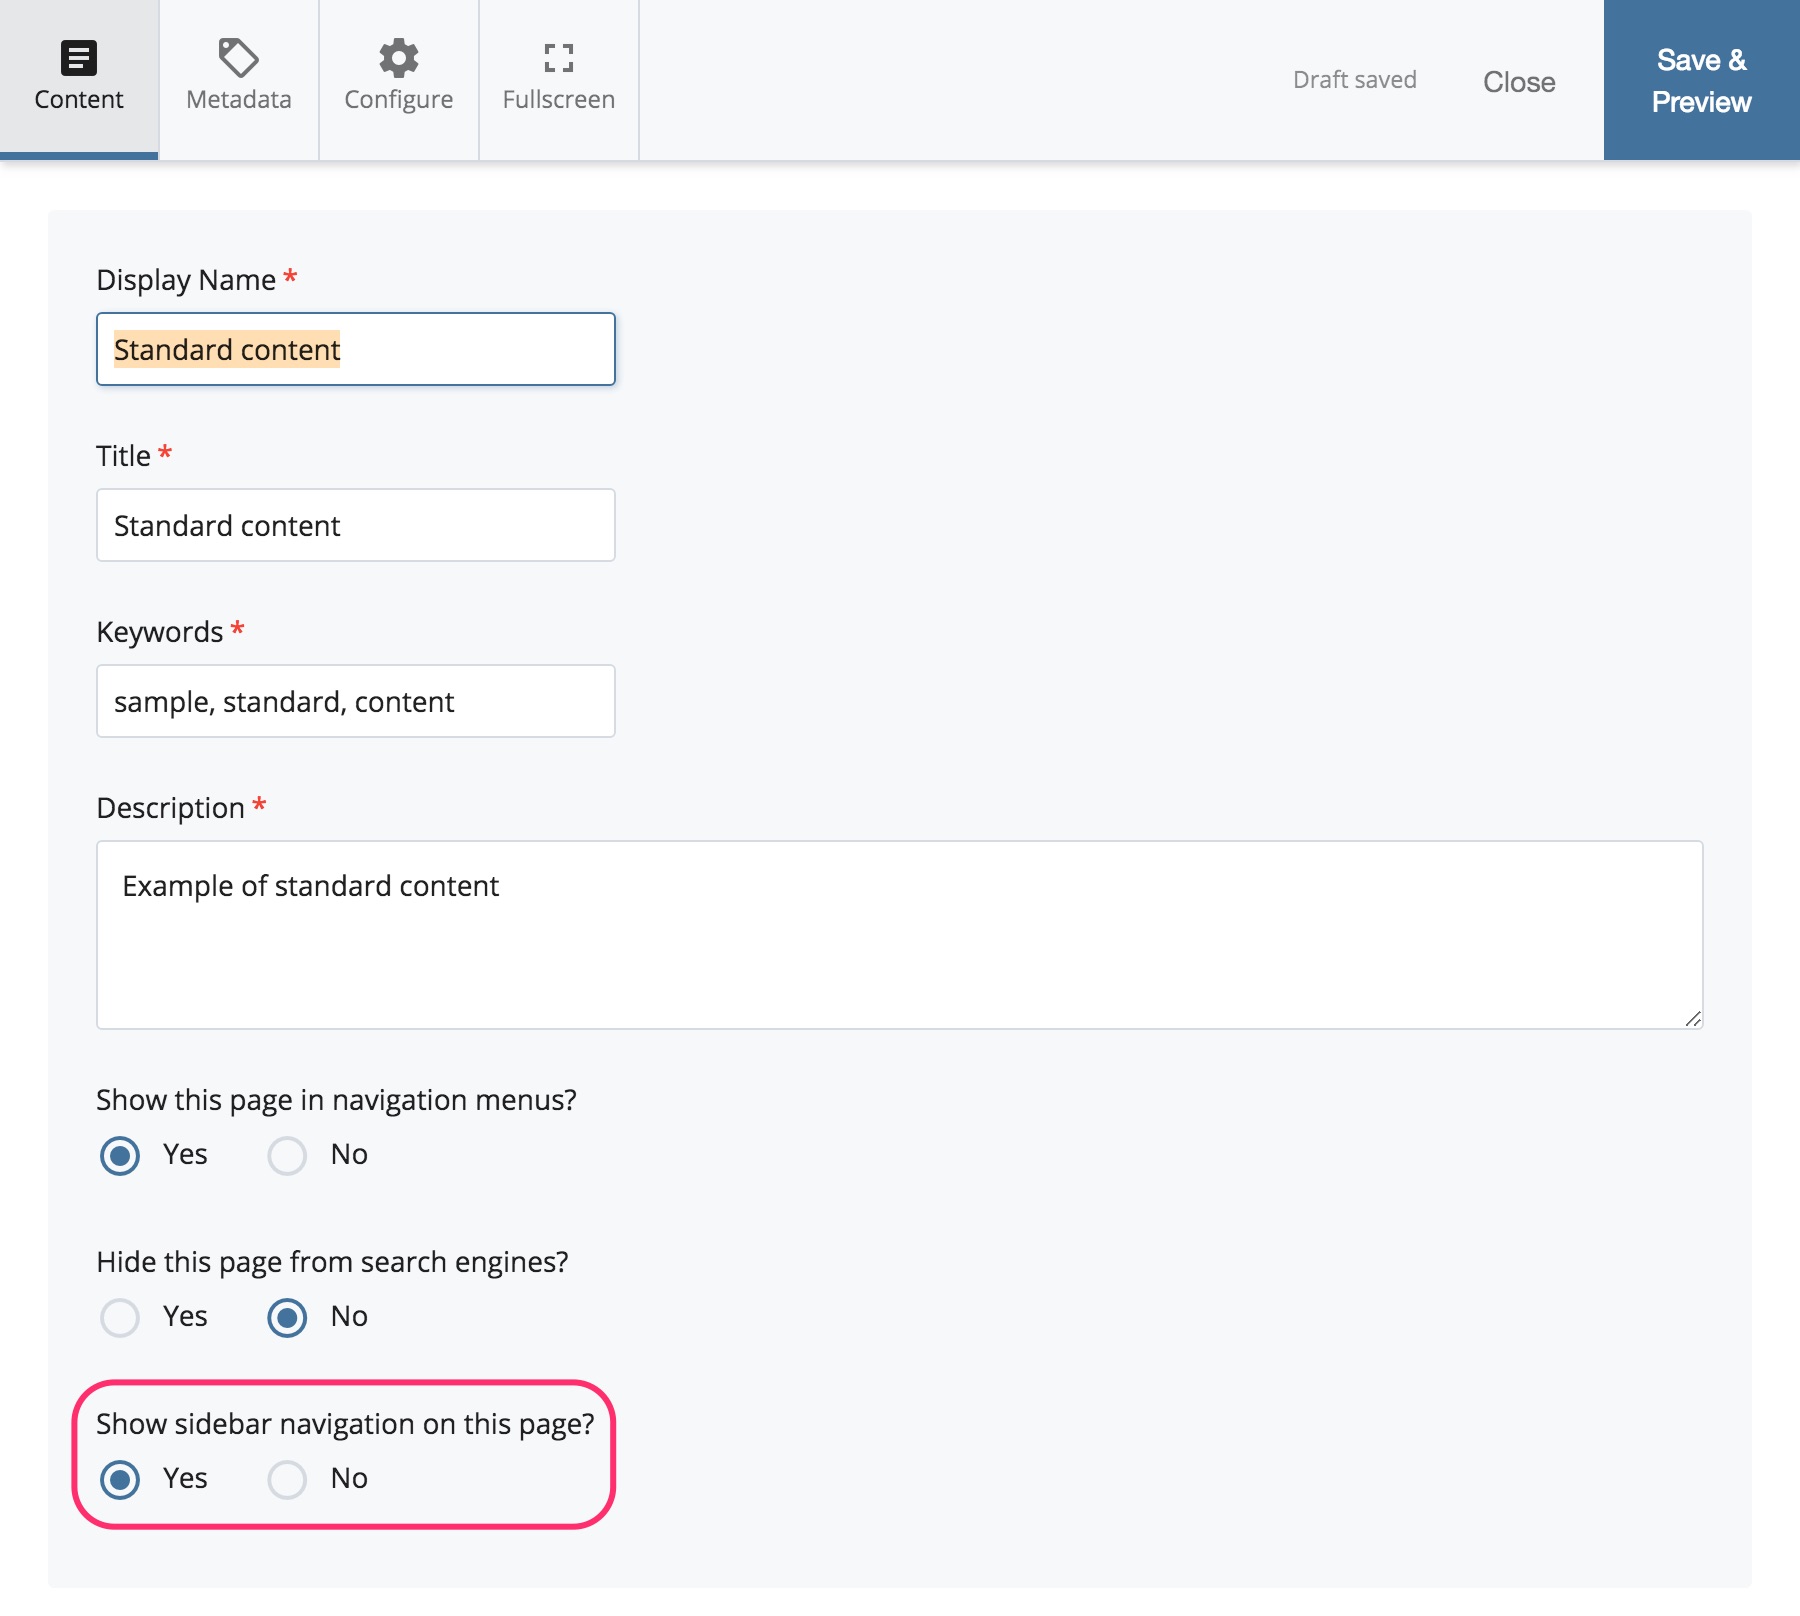
- In the Inline Metadata section of the page editor, set the Show sidebar navigation on this page? option to No.
-
Call-to-action buttons
Sidebar options include custom call-to-action buttons or widgets that can be added to the page sidebar. Sidebar options can be included even if the sidebar navigation menu is excluded.
On large screen sizes, the sidebar appears on the left side of the main content area. On small- and medium-screen sizes, the sidebar moves below the main content area.
Call-to-action buttons are sidebar buttons that consist of link text, the link URL, an icon, and a background colour. The icon and colour are selected from a pre-defined list of available options.
You can create custom call-to-action buttons on specific pages, contact us to have a pre-defined (templated) button block created. If you know that you will be using the same button on several pages, it will be easier to have the Web Team create a pre-defined button so that you can just browse to and select this button on each page, without having to re-enter the text, url, icon, etc., on every page.
How toAdd a call-to-action button to a page
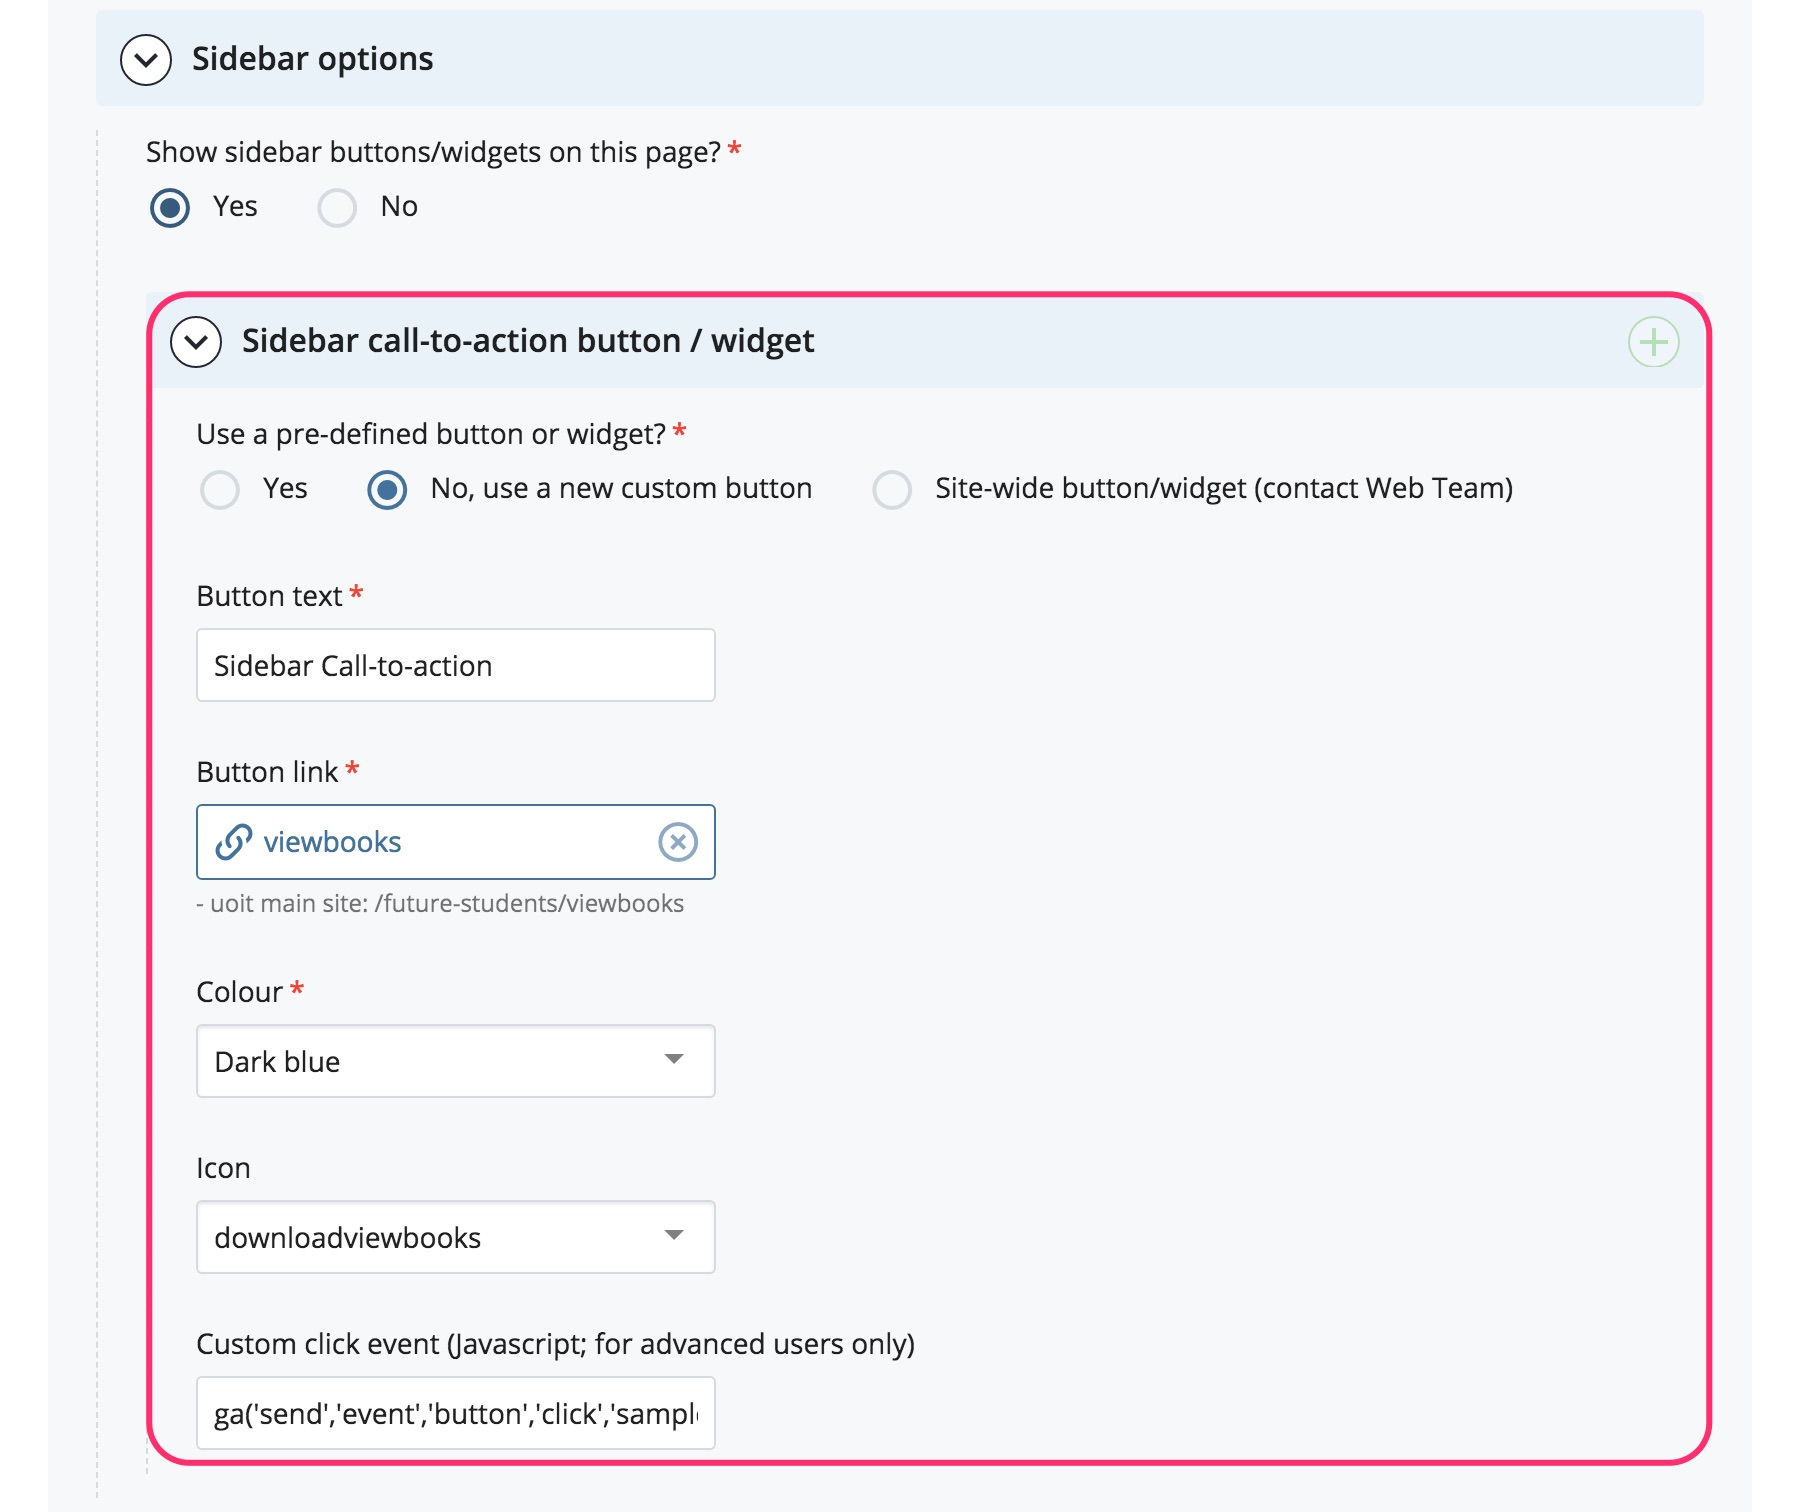
- In the page editor, expand the Sidebar options section.

- Set the Show sidebar buttons/widgets on this page? option to Yes. A sidebar button/widget editor section will appear.
- If we created a pre-defined button for you, set the Use a pre-defined button/widget? option to Yes. Otherwise, select No, use a new custom button to create a unique button.
Use a pre-defined button:
- Follow steps 1 to 3 above to add a call-to-action button to the page.
- In the Button/widget block field, browse to and select the pre-defined button block that we created for you.
Use a new custom button:
- Follow steps 1 to 3 above to add a call-to-action button to the page.
- In the Button text field, enter the link text to be used for the button (e.g. download viewbook).
- In the Button URL field, select the CMS page to which you want the button to link. If you want to link to an external webpage (outside of the UOIT CMS), send us a request to have a pre-defined button block created.
- Select the background colour of the button in the Colour dropdown field.
- To include an icon, select an icon name from the Icon dropdown field. Preview the available icons.
- You can include click event tracking for Google Analytics in the Click event field (for advanced users only). We can create the event tracking code and you can copy and paste the code into this field.
- In the page editor, expand the Sidebar options section.
-
Widgets
Sidebar options include custom call-to-action buttons or widgets that can be added to the page sidebar. Sidebar options can be included even if the sidebar navigation menu is excluded.
On large screen sizes, the sidebar appears on the left side of the main content area. On small- and medium-screen sizes, the sidebar moves below the main content area.
Widgets are custom sidebar modules that we can create. Widgets can be just about any type of content or form. An example custom Program Finder widget can be viewed on ontariotechu.ca/programs. Submit a Project Initiation form to request a custom sidebar widget or contact us to inquire about the types of widgets that can be created.
How toAdd a widget to a page
- In the page editor, expand the Sidebar options section.

- Set the Show sidebar buttons/widgets on this page? option to Yes. A sidebar button/widget editor section will appear.
- Set the Use a pre-defined button/widget? option to Yes.
- In the Button/widget block field, browse to and select the pre-defined widget block that we created for you.
- In the page editor, expand the Sidebar options section.